Pick ticket
Use this transaction to carry out shipment preparations by picking products in the warehouse:
-
From a picking list (grouping several pick tickets)
-
From a single pick ticket (grouping several pick ticket lines)
When a pick ticket is processed, its status can be set to Deliverable.
How to process pick tickets
Open: Picking > Pick ticket
To process a pick ticket, you must enter information on 3 pages:
- The initial page is used to select a pick list or a pick ticket and the transaction to be used.
- The second page is used to select a pick ticket line.
- The third page is used to enter the stock information to be picked for each ticket line and finally change the status of the pick ticket to Deliverable.
Operating mode
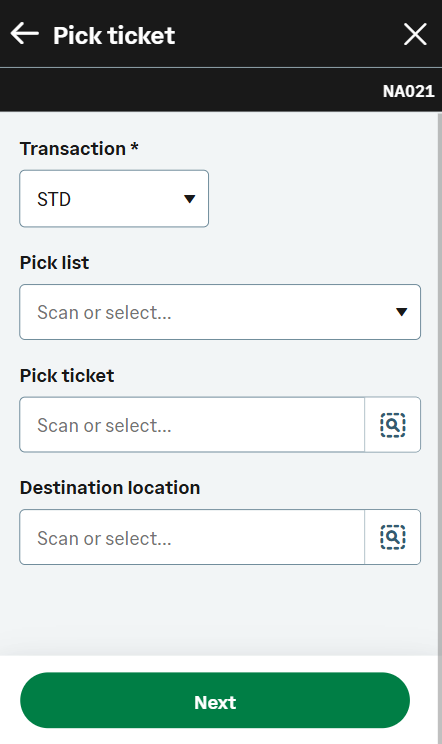
- In the initial page:
- Check that the Site and Transaction default values are correct.
- Select a Pick list or a Pick ticket. You can also set a unique destination location for all the ticket lines linked to the selected pick list or pick ticket.
- Tap Next to display the Select a line page.
- Tap a pick ticket line from the To do list. The Enter line details page automatically displays.
-
Enter the quantity to be picked and the stock detail information.
When the line has a Detailed allocation type and the serial number management mode of the product is Globally Received/Issued, each serial number is processed separately:-
Tap Next when you have processed a serial number. The Enter line details page automatically displays again.
-
Repeat step 4 for each serial number.
-
-
Tap Submit when you have processed a pick ticket line. The Select a line page automatically displays: The line is removed from the To do list. It displays now in the Done list.
- Repeat step 3 to step 6 for each pick ticket line.
-
When all the lines have been updated, the following message displays: "Set the pick ticket to deliverable?". Tap Yes to update the status of the pick ticket to Deliverable.
Step by step
Pick ticket initial page
|
|
|
| When you have selected a Pick list or a Pick ticket, tap Next to display the Select a line page. |
When the pick ticket is in detailed allocation
Select a line

|
In this page, you can toggle between the To do and the Done ticket lines.
|
|
| Use the Search field to filter the content of the list: scan or type manually a pick ticket number, a product code or a product description. | ||
|
The list is sorted by pick ticket number and then by product code.
|
||
| Tap a pick ticket to display the Enter line details page. |
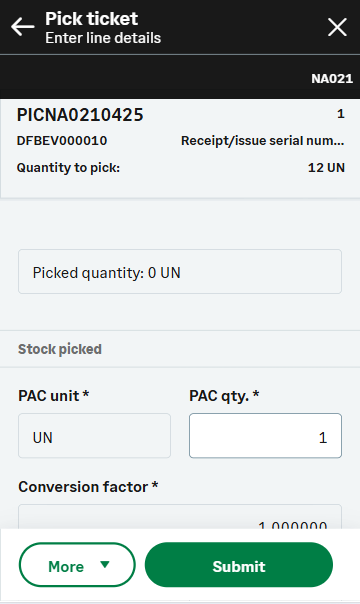
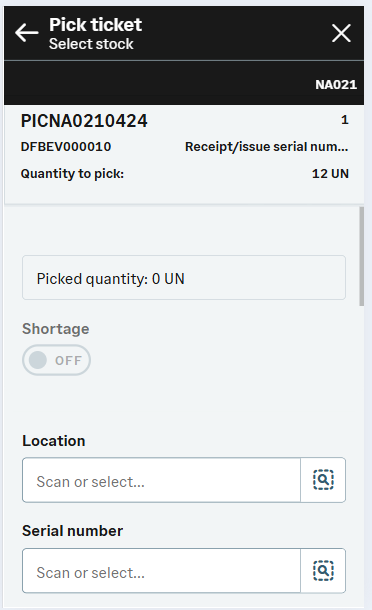
Enter line details
|
The header displays the following information:
|
||||
|
The Picked quantity displays the quantity already picked (If the pick ticket line is split between different locations or lots).
Filter entry lines display. The filters available depend on the management mode of the product. Additional fields display. They are described in the table below.
|
|||||
|
|
|||||
|
|
|
|||
|
Tap Submit when you have processed a pick ticket line. The following message displays: "Set the pick ticket to deliverable?". Tap the following options:
|
When the pick ticket is in global allocation
Select a line

|
In this page, you can toggle between the To do and the Done ticket lines.
|
|
|
Use the Search field to filter the content of the list: scan or type manually a pick ticket number, a product code or a product description. |
||
|
The list is sorted by pick ticket number and then by product code.
|
||
| Tap a pick ticket to display the Enter line details page. |
|
The header displays the following information:
|
|
|
|
||
|
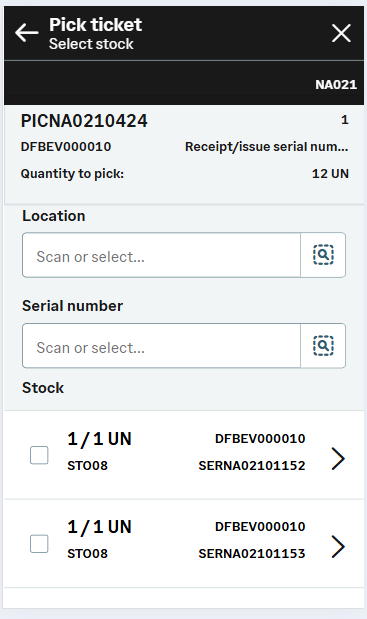
Filter entry lines display. Use the Scan or select... fields to filter the stock lines. |
|
|
|
||
| The stock lines available for this pick ticket display. Select and tap a stock line to display the Enter line details page. | ||
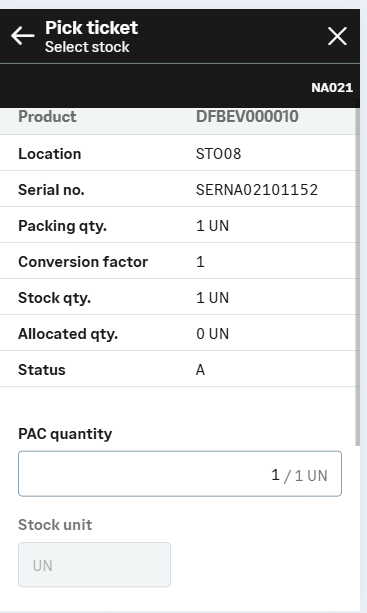
Enter line details
|
The top of the page displays the stock line detail. This information cannot be edited. |
|||||
|
|
||||||
|
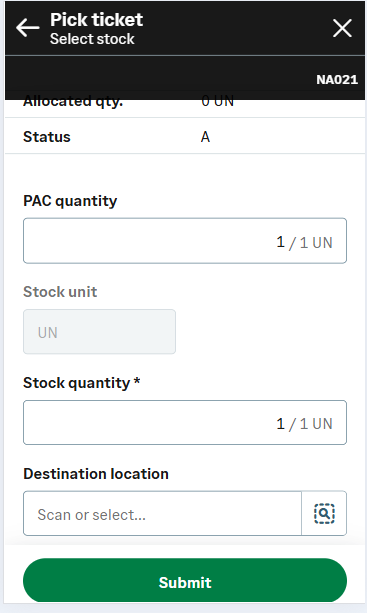
Scroll down the stock line detail page to see the other fields.
|
||||||
|
|
|||||
Management by exception is applied. Only some of these fields will display, depending on the Product settings (GESITM) or on some of the functional settings defined in the Pick ticket entry transaction (GESPRT) being used.
| Field | Product settings |
Entry transaction |
Description |
|---|---|---|---|
| Stock quantity |
The picked quantity, in stock unit. You can change it. Note - informationIf the quantity in stock is not enough to fulfill the pick, enter a quantity equal to 0. The following message displays: "Create a shortage?'. Tap Yes to update the sales order line with the shortage quantity. The Select a line page displays again and allows you to select another pick ticket line.
|
||
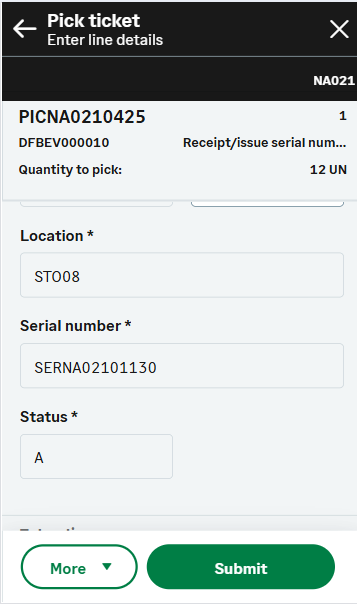
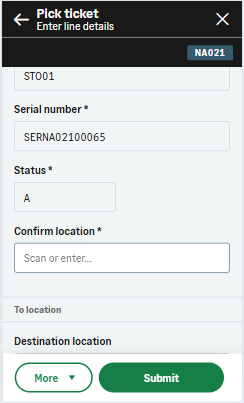
| Status | X | X | Select the Status when the line has a Global allocation type. The status displays automatically and cannot be modified when the line has a Detailed allocation type. This information is mandatory. |
| To location | X | X |
The To location field displays only if the Enter destination location check box is selected in the entry transaction. This information is mandatory. Scan or select the destination Location. By default, it displays the location selected in the Pick ticket initial page. You can select another location when the line has a Global allocation type. When the line has a Detailed allocation type, the destination location displays automatically and cannot be modified. |
| Lot / Sublot | X | The Lot and Sublot display only if the product is managed by lot. Scan, select or enter the lot/sublot number when the line has a Global allocation type. The lot and sublot display automatically and cannot be modified when the line has a Detailed allocation type. This information is mandatory. |
|
| License plate number |
The License plate number displays only when the following conditions are met:
|
||
| Serial number | X |
The Serial number field displays only if the product serial number management mode is Received/Issued or Globally Received/Issued.
|
| Field | Description | Sage X3 field code | Table (data query) |
|---|---|---|---|
| Site | Issue site | STOFCY | SMVTH |
| Pick list | Pick list | PRLNUM | STOPRELIS |
| Pick ticket | Pick ticket | PRHNUM | STOPREH |
| Product | Product | ITMREF | STOPRED |
| To location | Location | LOCDES | STOPRED |
| Quantity to pick | Allocated quantity | OALQTYSAL | STOPRED |
| Unit | Packing unit | PCU | STOPRED |
| Conversion factor | Conversion factor | PCUSTUCOE | STOPRED |
| Quantity | Packing quantity | QTYPCU | STOPRED |
| Stock quantity | Stock quantity | QTYSTU | STOPRED |
| Status | Status | STA | STOALL |
| From location | Location | LOC | STOALL |
| Lot | Lot number | LOT | STOALL |
| Sub-lot | Sub-lot number | SLO | STOALL |
| Serial number | Serial number | SERNUM | STOALL |